Thursday, November 20, 2014

Expectation vs. Reality

Hey guys I am sorry for the sloppy posts this week.

I been busy, Sunday was church and do nothing day. Tuesday I went out out with my mom, sisters, and my tiny nephew. Wednesday,  I made the Gunter which took like eight hours and I still manged to get black paint all between his eyes! Good grief! Yesterday I went to Opry Mills Mall with Mom and a friend of mine and today I'm going out for my birthday with some friends from church! You get my drift!

My posts will hopefully go back to it original random awesomeness that we all know and love! Lets do this thing!


We all have expectations often they are completely different that reality.


And marketing! Don't get me started!


Marketing again! Not. The. Same.


                         I THINK I can make a straight line with a pencil but... nope!


                                    You know that's true!


                            I actually tried this one turns out you just eat them out of the bag forget that stuff!


I had the expectation to make things all deep and awesome here but reality I got nothing, so I hope you will have a great weekend! (In reality it took me a hour and ten minutes to make this.)

Until later!!

Wednesday, November 19, 2014

Gunter DIY


I made this totally adorable Poly Clay Penuguin inspired from the Cartoon Network television show Adventure Time.

This is some pics of Gunter.

This is the video that I used. 


Monday, November 17, 2014

A lovely Monday!


Hey guys, I don't know about you but I got a decent dusting of snow it is the first time tha it has snowed on my birthday that I can remember! It always has been cold though! Today is my thirteenth birthday, it doesn't seem right that I'm this old! It seem just yesterday that I was in first grade! How time passes!!

 I could not resist taking pictures of my cat, Gwaine's, snowy foot prints!!! 


Today is my little kitten, Rigby's, first snow! We found her earlier this summer around June. She keeps on putting her nose on the window and shivering! She loves sitting on her big cat perch and watching at the world pass by!


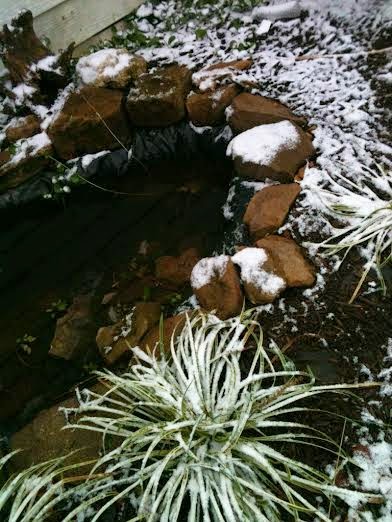
                                                   For a comparison from October 27 2014

November 17th 2014

 
Half of our fish pond is frozen over. I think I saw a peek of a fish wearing an argyle sweater!!


Thanks for reading and I hope you have a splendid day! Until later!

Thursday, November 13, 2014

GALAXY TARDIS BOOKMARK

Sorry guys I was not able to post yesterday, me, my mom, my two big sisters, Ashlea and Amber, my nephew, Gabe and Amber's future mother in law and brother in law. Went to look at a venue for Amber's wedding next spring. I ended up not getting home till 4:00 PM and sleepy me doesn't keep the promises that awake me makes so I'm making up for the missing post today. I whipped up a quick DIY this morning and took some pictures. Sorry for the lighting I did do these on the floor in my room so it's pretty dark. My curtains where closed because, cold can go through windows very easy. is it just me of have you felt like a Strawberry Popsicle in a sweater? Hahaha  let's get on with the post!


First print out a TARDIS/Police Phone Box like this one. (Print it out on watercolor or card stock paper, you'll thank me later!)

Then use a cutting board to make it smaller.


Grab some water colors, I've used most of these but it will work.


Go crazy with the color. Don't worry if you color out of the lines!! Let this dry.

Grab some white paint,

and make small stars and sparse brush strokes with almost paint less brushes. 

Add black paint in the darkest areas then let completely dry. And proceed to cut out. Look below to see your lovely galaxy TARDIS bookmark!


Thank you for you patience!
Until later!  

Monday, November 10, 2014

Goorin Bros. Hat Shop

Hey guys, I didn't think of a devotional  for today, but I did find a subject for today so lets get to it!!


As you may know hats where pretty big for woman's fashion in the 1920's era.


Oops how did this get here........


If you know me well, I am obsessed with the beautiful style of the 1900--1960's and while I was spending the weekend with my lovely Aunt and Uncle, we went of a walk through downtown Nashville, Tennessee.  I love the old feel of the buildings and the unique things that are sold in the shops.

 One store I particularly loved. It's called Goorin Brothers Hat Shop. It is filled with gorgeous hats in all kinds of colors materials. All of them are styled like back in the 1920's.

Me and my Uncle both bought hats here.


Here's some pictures of my new Cloche Hat. I also bought a hat feather for it at that same shop.


I'm not sure where the white gloves came from, but they are my sister's, and so are the costume pearls. The beautiful brooch is my mothers and I think that she said that she got it from a yard sale a long while ago.


I hope you guys enjoyed this post as much as I enjoyed taking pictures for it!!

Until later!!


Friday, November 7, 2014

Friday

Sorry for the late post today, I hope you all have had wonderful days I spent it with my lovely grandmother. We went birthday shopping. It is a tradition to go out with my grandmother before our birthdays to buy our own birthday gifts. This prevented ill fitting clothes and we got things we really needed and wanted then we have lunch. It has happened since I was around 7 when my Granny didn't know what to give my older sisters and me. I love my grandmother so much and it is an pleasure to be with her!

Until tomorrow!

Wednesday, November 5, 2014

DIY Tie Dye Notebook with Quote


 Hey guys I had  a really fun time doing the notebooks so I made a few more. Here is a tutorial for another notebook.


Grab a composition notebook and tape up the binding with any old masking/painters tape.


Then grab a large brush and some white paint to create a nice white base.

You will need several coats paint so it looks like this

Before the last coat drys rip up that painters tape.

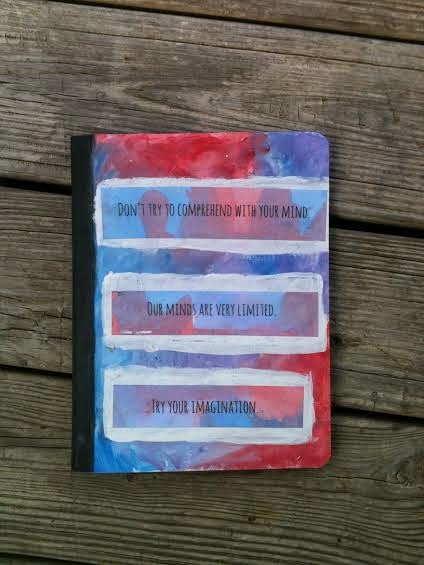
 Then what I do next is go on Google Drive or whatever document you have on you computer and type out a quote on a sheet of paper then I cut it with a paper cuter write around the words. The quote I chose was 'Don't try to comprehend with your mind, minds are very limited. Try imagination." So you have to print it like this;


                                           DON'T TRY TO COMPREHEND WITH YOUR MIND,


                                                       OUR MINDS ARE VERY LIMITED


                                                              TRY IMAGINATION.

Make plenty of spaces between the word in you quote. Make sure you cut your quote with plenty for space when you make it.


 Place one of your quote clippings in a sink or on a Styrofoam plate.


I forgot to take picture of this but get three different blobs of paint that can blind well with each other and add a little bit of water.

Then stir till the pigments is evenly distributed in the water.

Do this with the other two colors


Grab one of your paint and water mixture and the paper clipping on the plate

Pour your color of choose onto the clipping, be sparing it should look something like this.

You can also pour a bit on the plate and lay it face down on the blob of awesome.


It will look like this.


Dip or pour the rest of the clippings to look some thing likwe this and lay them out to dry. ( if you want it to go quicker, you can grab a hair dryer and blow dry them on low with a warm or cool heat setting.)


Get the same paints as you used earlier for the water/paint mixtures. (You don't need white paint.)


( The next step works best if the white base coat is still a bit wet so if completely dry add a thin coat of white to dry for maybe 5 minutes) Add another strip of painters tape to the book and Then make a squiggle line with your paint of chose and fill in the corner you created repeat all over notebook  alternating colors and move to next step with out letting dry. Also don't worry about the appearance you painting.


 Now take your finger in a circular motion to smear paint and create a tie dye affect. Take off the painters tape from the binding 
 (By the way, if you where wondering, I am doing another quote be cause I forgot about taking the rest of the pictures when I was do in the front so I have a different quote for the back but it with be the same instructions.)

Get your dried clipping and figure out where you want them on the cover. If you want to paint around the quote like in the picture near the bottom do this now. I just used a pencil to make a rectangle about a half an inch bigger all around the clipping them took away the clipping a messily filled in the rectangles the let ththem to dry.


Then put glue on the back of the clippings and place them where you want on the notebook. (Or in the white rectangles.)

Then put stripes of glue over the clippings, and use a large brush to spread the glue thinly over the paper clippings.

Then add more stripes of Elmer's glue on the rest on the rest of the cover,
spread it out as well. Let it dry and your journal is done!


This is what it looks like when you put white rectangles around it.


This what it looks with out.
I hope everyone enjoys this post. 


Here's an updated picture of my precious nephew!!!!!


                                                                       Until later!